Another cool tutorial I will share to you today on how to code horizontal tags buttons using HTML & CSS. This tutorial can be applied if you have a blog website that has tags buttons and you need to customize it to have a different look and feel versus the traditional way of designing it with underline.
In order to understand and follow this tutorial, you must have at least basic knowledge in HTML & CSS coding. If you have no experience yet on using these technologies mentioned, I strongly recommend the W3schools website to learn and understand the basics.
Let’s start coding mate!
Setup the HTML structure.
This sample HTML structure below is a simple structure containing a list of tags links. It needs to be styled to have a button look and feel.
    <!DOCTYPE html>
    <html lang="en" dir="ltr">
        <head>
            <meta charset="utf-8">
            <title>Horizontal Tags Buttons Tutorial</title>
        </head>
        <body>
            <div id="tags-container">
                <ul id="tags-list">
                    <li>
                        <a href="#">Technology</a>
                    </li>
                    <li>
                        <a href="#">Food</a>
                    </li>
                    <li>
                        <a href="#">Sports</a>
                    </li>
                    <li>
                        <a href="#">Politics</a>
                    </li>
                    <li>
                        <a href="#">Design</a>
                    </li>
                    <li>
                        <a href="#">Programming</a>
                    </li>
                    <li>
                        <a href="#">People</a>
                    </li>
                    <li>
                        <a href="#">Personal</a>
                    </li>
                    <li>
                        <a href="#">Gadgets</a>
                    </li>
                    <li>
                        <a href="#">History</a>
                    </li>
                    <li>
                        <a href="#">Company</a>
                    </li>
                    <li>
                        <a href="#">Showbiz</a>
                    </li>
                    <li>
                        <a href="#">Celebrity</a>
                    </li>
                    <li>
                        <a href="#">Business</a>
                    </li>
                </ul>
            </div>
        </body>
    </html>
Next step is to create the CSS file to add styling on the tags.
I have created the CSS file called style.css and placed this inside the CSS folder.
<link rel="stylesheet" type="text/css" href="css/style.css">
Here’s the main source code of the CSS file.
@charset "UTF-8";
#tags-container ul#tags-list::after, #tags-container::after {
content: "";
display: table;
clear: both;
}
#tags-container {
width: 600px;
float: left;
}
#tags-container ul#tags-list {
margin: 0;
padding: 0;
}
#tags-container ul#tags-list li {
font: bold 12px Arial, Helvetica, sans-serif;
list-style-type: none;
text-align: center;
text-transform: uppercase;
letter-spacing: 1px;
margin: 0 10px 10px 0;
float: left;
}
#tags-container ul#tags-list li:last-child {
margin-right: 0;
}
#tags-container ul#tags-list li a {
color: #000;
background-color: transparent;
text-decoration: none;
padding: 8px 16px;
display: block;
border: 1px dashed #000;
position: relative;
-moz-box-sizing: border-box;
-webkit-box-sizing: border-box;
box-sizing: border-box;
-webkit-transition: all 0.3s ease-out;
-moz-transition: all 0.3s ease-out;
-ms-transition: all 0.3s ease-out;
-o-transition: all 0.3s ease-out;
transition: all 0.3s ease-out;
-webkit-border-radius: 40px 40px 40px 40px;
border-radius: 40px 40px 40px 40px;
}
#tags-container ul#tags-list li a:hover {
color: #000;
background-color: #fed100;
text-decoration: none;
border: 1px solid #000;
padding: 8px 16px 8px 30px;
}
#tags-container ul#tags-list li a:hover::after {
color: #000;
left: 10px;
-webkit-transition: all 0.3s ease-out;
-moz-transition: all 0.3s ease-out;
-ms-transition: all 0.3s ease-out;
-o-transition: all 0.3s ease-out;
transition: all 0.3s ease-out;
}
#tags-container ul#tags-list li a::after {
content: "";
font: 400 16px "Material Icons";
color: transparent;
position: absolute;
top: 6px;
left: 0;
-webkit-transition: all 0.3s ease-out;
-moz-transition: all 0.3s ease-out;
-ms-transition: all 0.3s ease-out;
-o-transition: all 0.3s ease-out;
transition: all 0.3s ease-out;
}
/*# sourceMappingURL=css/style.css.map */
Also, I used an arrow icon from Material Design website for the tags buttons on hover state. Here’s the HTML code on how to call the icon (via CSS) from the Material Design website.
<link rel="stylesheet" type="text/css" href="https://fonts.googleapis.com/icon?family=Material+Icons">
Here’s the complete HTML structure of the page + the CSS files (both style.css & from material design icon).
    <!DOCTYPE html>
    <html lang="en" dir="ltr">
        <head>
            <meta charset="utf-8">
            <title>Horizontal Tags Buttons Tutorial</title>
            <link rel="stylesheet" type="text/css" href="https://fonts.googleapis.com/icon?family=Material+Icons">
            <link rel="stylesheet" type="text/css" href="css/style.css">
        </head>
        <body>
            <div id="tags-container">
                <ul id="tags-list">
                    <li>
                        <a href="#">Technology</a>
                    </li>
                    <li>
                        <a href="#">Food</a>
                    </li>
                    <li>
                        <a href="#">Sports</a>
                    </li>
                    <li>
                        <a href="#">Politics</a>
                    </li>
                    <li>
                        <a href="#">Design</a>
                    </li>
                    <li>
                        <a href="#">Programming</a>
                    </li>
                    <li>
                        <a href="#">People</a>
                    </li>
                    <li>
                        <a href="#">Personal</a>
                    </li>
                    <li>
                        <a href="#">Gadgets</a>
                    </li>
                    <li>
                        <a href="#">History</a>
                    </li>
                    <li>
                        <a href="#">Company</a>
                    </li>
                    <li>
                        <a href="#">Showbiz</a>
                    </li>
                    <li>
                        <a href="#">Celebrity</a>
                    </li>
                    <li>
                        <a href="#">Business</a>
                    </li>
                </ul>
            </div>
        </body>
    </html>
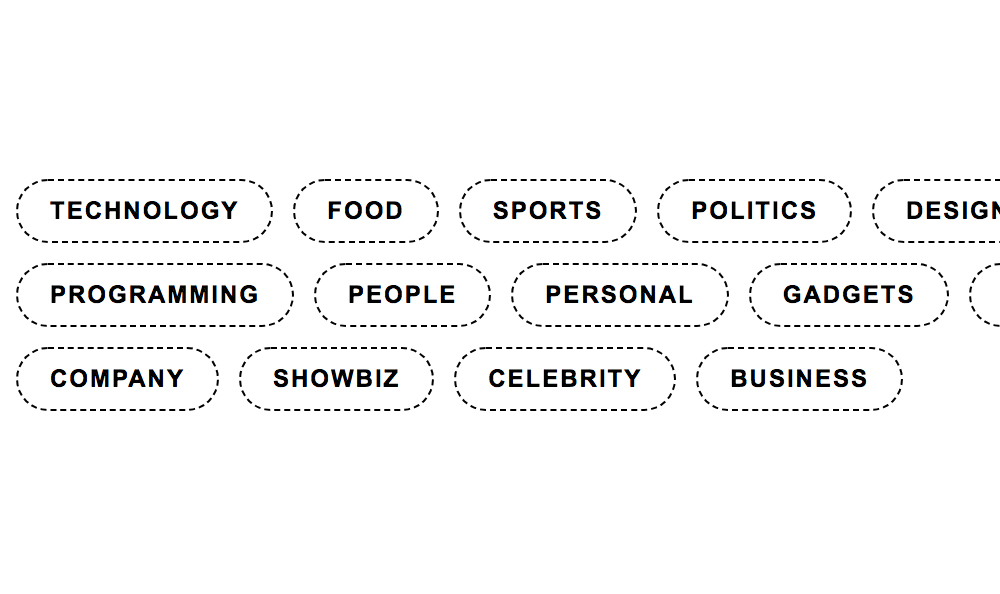
We’re done!
Check Out The Preview
If you find it difficult to follow this tutorial, feel free to contact me and I will be happy to assist you. I hope you find this tutorial informative, interesting and useful to your website projects. Thank you.