Today, I want to share with you on how to code simple Jquery tabs from scratch without using any plugin or web framework so that you can easily customize the design. This Jquery tabs is very useful to your website project either at work or freelance. In order to start this project, I assume that at least you have basic understanding about HTML, CSS and Jquery coding. If you are not yet familiar with these technologies mentioned, you can visit W3schools website to learn the basics.
Ok. No more further ado or long introduction, let’s start coding!
First step – setup the HTML structure
On this HTML structure below, it has 3 tabs for example only.
    <!DOCTYPE html>
    <html>
        <head>
            <meta charset="utf-8">
            <title>Simple Jquery Tabs Tutorial</title>
        </head>
        <body>
            <div class="contents">
                <ul id="menu-tabs">
                    <li>
                        <a href="#" class="tab1">Tab 1</a>
                    </li>
                    <li>
                        <a href="#" class="tab2">Tab 2</a>
                    </li>
                    <li>
                        <a href="#" class="tab3">Tab 3</a>
                    </li>
                </ul>
                <div class="content1">
                    <h2>Tab 1 Title</h2>
                    <p>Text goes here...</p>
                </div>
                <div class="content2">
                    <h2>Tab 2 Title</h2>
                    <p>Text goes here...</p>
                </div>
                <div class="content3">
                    <h2>Tab 3 Title</h2>
                    <p>Text goes here...</p>
                </div>
            </div>
        </body>
    </html>
The HTML structure will look like this image below once previewed on a browser. It is plain and boring.

It’s time to style it by adding CSS code
I’ve created style.css file and put it inside css folder. Here’s the code on how to insert css file on your HTML page.
<link rel="stylesheet" type="text/css" href="css/style.css">
The CSS file which is style.css will contain these codes below.
    .contents {
      width: 90%;
      padding: 20px;
      border: 1px solid #000;
      padding: 20px;
      margin: 60px 0 0 0;
      position: relative;
      -moz-box-sizing: border-box;
      -webkit-box-sizing: border-box;
      box-sizing: border-box;
    }

    .contents h2 {
      font: bold 18px Arial, Helvetica, sans-serif;
      color: #000;
      text-transform: none;
      margin: 0 0 20px 0;
    }

    .contents p {
      font: normal 14px Arial, Helvetica, sans-serif;
      color: #000;
      text-transform: none;
      line-height: 24px;
      margin: 0 0 20px 0;
    }

    .contents ul#menu-tabs {
      margin: 0;
      padding: 0;
      position: absolute;
      top: -42px;
      left: -1px;
      z-index: 2;
    }

    .contents ul#menu-tabs li {
      font: bold 14px Arial, Helvetica, sans-serif;
      list-style-type: none;
      text-transform: uppercase;
      display: inline-block;
      margin: 0 5px 0 0;
    }

    .contents ul#menu-tabs li a {
      color: #000;
      text-decoration: none;
      padding: 12px 24px;
      display: block;
      border-top: 1px solid #000;
      border-left: 1px solid #000;
      border-right: 1px solid #000;
      border-bottom: 1px solid #fff;
      -moz-box-sizing: border-box;
      -webkit-box-sizing: border-box;
      box-sizing: border-box;
      -webkit-transition: all 0.3s ease-out;
      -moz-transition: all 0.3s ease-out;
      -ms-transition: all 0.3s ease-out;
      -o-transition: all 0.3s ease-out;
      transition: all 0.3s ease-out;
    }

    .contents ul#menu-tabs li a:hover {
      color: #000;
      background-color: #ddd;
      border-bottom: 1px solid #ddd;
    }

    .contents ul#menu-tabs li a.active {
      color: #fff;
      background-color: #000;
      border: 1px solid #000;
    }

    .contents .content1 {
      display: block;
    }

    .contents .content2, .contents .content3 {
      display: none;
    }
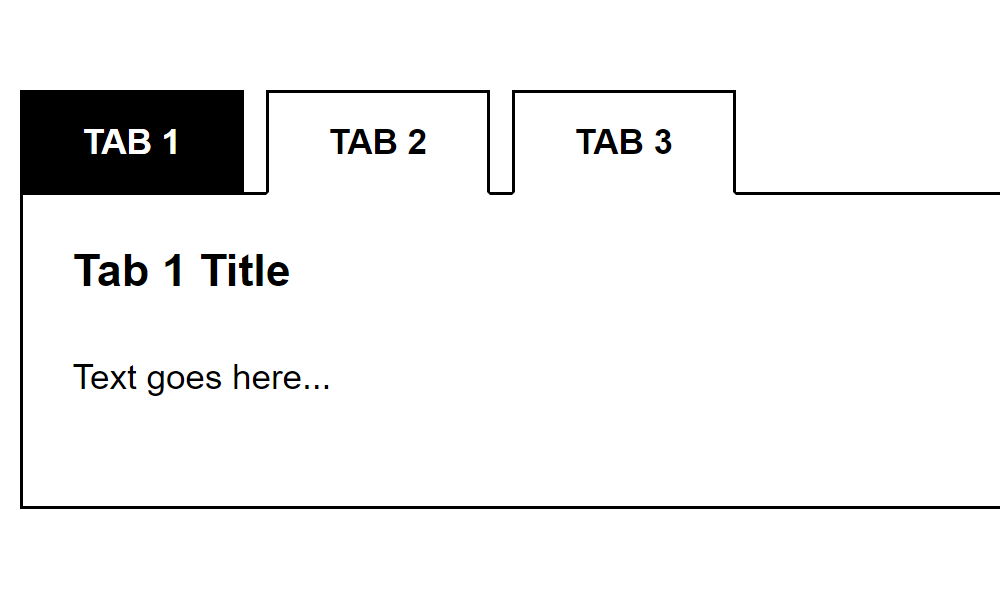
Now that we had inserted the CSS file, the HTML page has now exciting design and will look like this image below.

Next step is to insert the Jquery code to add more excitement and functionality to the tabs that will show its appropriate contents when clicked
First, we need to insert the Jquery package that we can get from this link. Here’s the code on how to insert the Jquery package to your HTML page.
<script src="https://ajax.googleapis.com/ajax/libs/jquery/3.3.1/jquery.min.js"></script>
After that, insert the Jquery code for the tabs to work properly. I’ve created custom.js Jquery file and put it inside js folder. Here’s the code on how to insert it on the HTML page.
<script type="text/javascript" src="js/custom.js"></script>
The custom.js Jquery file will have this source code below.
    $(function(){
    	function initial() {
      	$('.contents ul#menu-tabs li a.tab1').addClass('active');
      }
      function removeActiveClass() {
      	$('.contents ul#menu-tabs li a').removeClass('active');
      }
      function hideContents() {
      	$('.contents .content1, .contents .content2, .contents .content3').css({
        	'display' : 'none'
        });
      }
      initial();
      $('.contents ul#menu-tabs li a').click(function(event){
      	removeActiveClass();
        hideContents();
      	$(event.currentTarget).addClass('active');
        if($('.contents ul#menu-tabs li a.tab1').hasClass('active')) {
        $('.contents .content1').css({
        	'display' : 'block'
        });
      }
      else if($('.contents ul#menu-tabs li a.tab2').hasClass('active')) {
      	$('.contents .content2').css({
        	'display' : 'block'
        });
      }
      else if($('.contents ul#menu-tabs li a.tab3').hasClass('active')) {
      	$('.contents .content3').css({
        	'display' : 'block'
        });
      }
      else {
      	alert('ERROR!');
      }
      });
    });
Both of the Jquery package and custom Jquery file would be placed on the head tag of the HTML page. Here’s the updated HTML structure together with CSS and Jquery files.
    <!DOCTYPE html>
    <html>
        <head>
            <meta charset="utf-8">
            <title>Simple Jquery Tabs Tutorial</title>
            <link rel="stylesheet" type="text/css" href="css/style.css">
            <script src="https://ajax.googleapis.com/ajax/libs/jquery/3.3.1/jquery.min.js"></script>
            <script type="text/javascript" src="js/custom.js"></script>
        </head>
        <body>
            <div class="contents">
                <ul id="menu-tabs">
                    <li>
                        <a href="#" class="tab1">Tab 1</a>
                    </li>
                    <li>
                        <a href="#" class="tab2">Tab 2</a>
                    </li>
                    <li>
                        <a href="#" class="tab3">Tab 3</a>
                    </li>
                </ul>
                <div class="content1">
                    <h2>Tab 1 Title</h2>
                    <p>Text goes here...</p>
                </div>
                <div class="content2">
                    <h2>Tab 2 Title</h2>
                    <p>Text goes here...</p>
                </div>
                <div class="content3">
                    <h2>Tab 3 Title</h2>
                    <p>Text goes here...</p>
                </div>
            </div>
        </body>
    </html>
We’re done!
Check Out The Preview
If you find it difficult to follow this tutorial, feel free to contact me and I will be happy to assist you. I hope you find this tutorial informative, interesting and useful to your website projects. Thank you.